
In this article, we will explore all the payment options of Eduma. How to setup course payment using Eduma theme. You will learn how to start with the built-in Paypal payment, and then we will move to installing WooCommerce payment gateway to implement more payment gateways for your website. Besides WooCommerce, we also developed some payment gateway plugins so if you don’t want to use WooCommerce for your website for some reasons, you can skip the part 3 and read the part 4 of this tutorial. Finally, we will also take a look on the ability to create course membership of the theme using LearnPress Paid Membership Pro integration add-on.
This tutorial will be done with the best Education WordPress Theme – Eduma theme. However, any other Premium LearnPress Themes like Course Builder LMS, Coaching, Ivy School, etc. can also be done using the exact steps mentioned in this tutorial.
1 – Setting up payment right after theme installation the correct way.
Just like any other professional premium WordPress themes, Eduma comes with the demo data and one click installation that gives you a great looking website out of the box. However, since there are many ways a payment can be made and it’s impossible for us to know which customer wants to utilize which payment method so it is not set up automatically and you will need to go through it before running your website.
If you are just installing the theme, once you click on the button “Buy this course”, if you are not logged in, you will see the login modal box with no Registration button. This is because new WordPress installation turned of registration by default and if you want your students to be able to buy course, you will need to turn this option on.
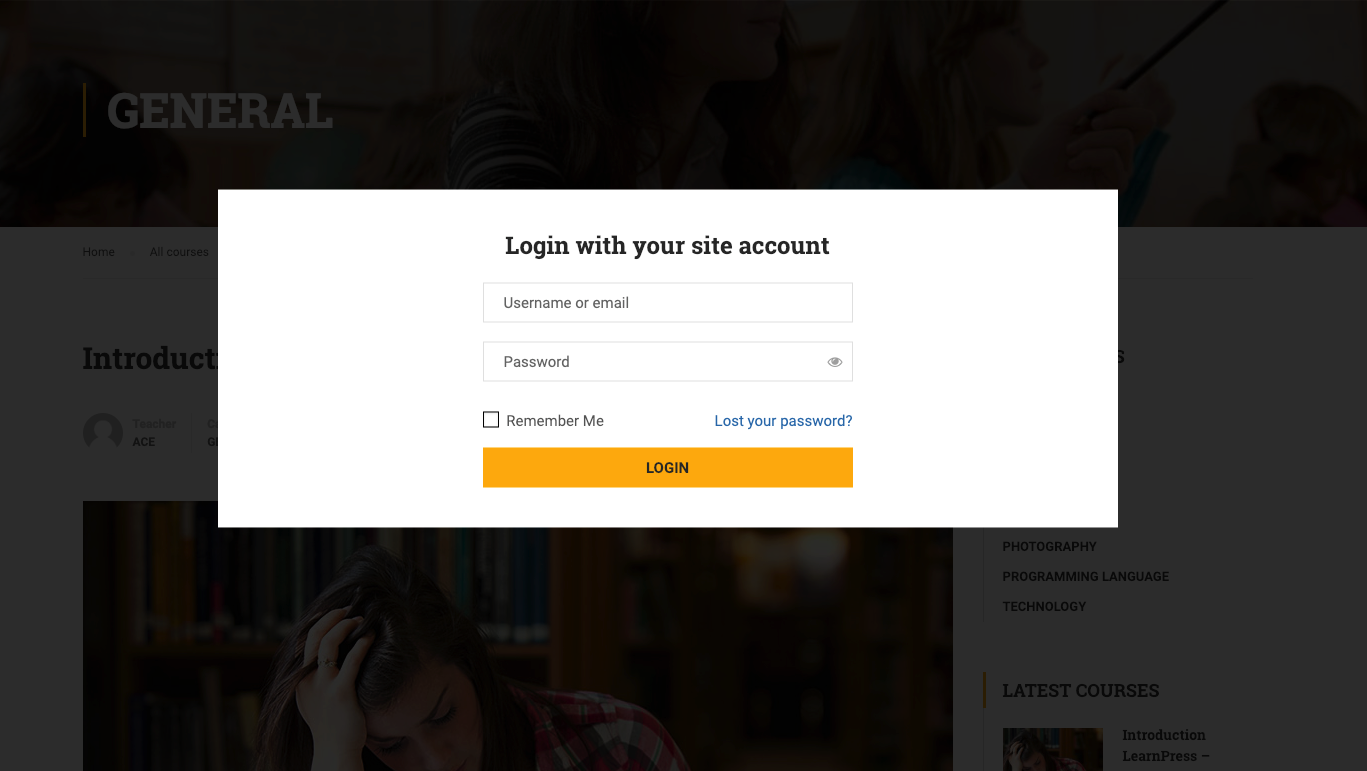
To enable sign up, please go to your WordPress Dashboard > Settings > General and in General Settings, click on Anyone can register in the Membership field so anyone can register to your website.
This only provide a basic Login/Registration form for your website that’s using WordPress’s default registration system. To implement a full feature Social Login system on your website, please refer to this video tutorial: If you need guidance on how to edit some other parts of the Eduma theme, please refer to this page:

After that, when someone click on the Buy this course button, if they are not logged in, they will be asked to sign up or log in before continue.
However, now if the user is logged in, there would still be an error: “Checkout page hasn’t been setup or page does not exists.”
This is because the checkout page has not been setup correctly.
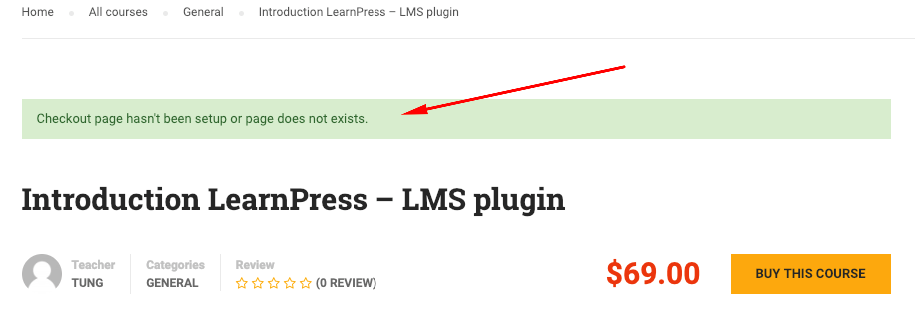
You can also see this issue in the WordPress Dashboard with this notification: “The following required page(s) are currently missing: Checkout Page.To ensure all functions work properly, please click here to create and set it up automatically.”

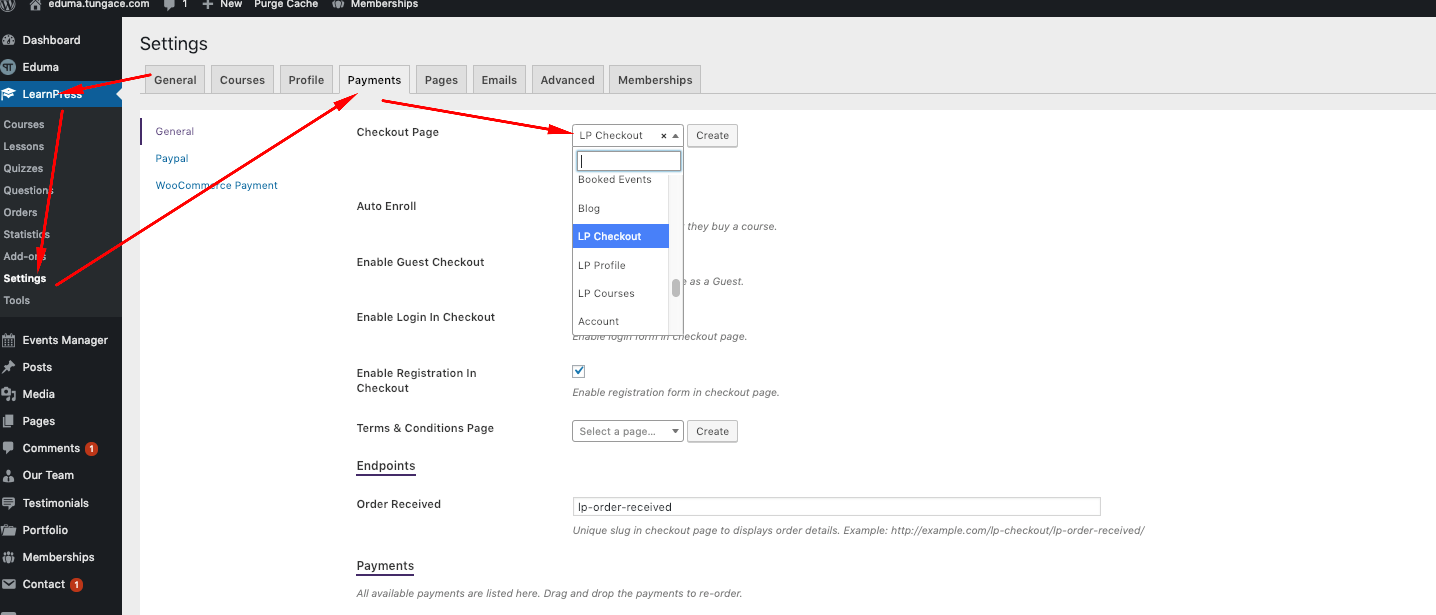
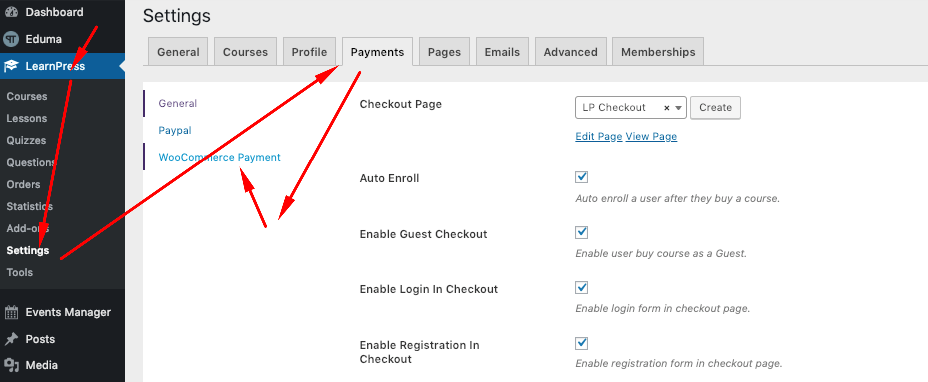
To fix this, please go back to your WP Admin dashboard, go to LearnPress > Settings > Payments > and then in the Payment tab, you will see the field for choosing a Check Page, then choose the page called “LP Checkout“. When you set the Checkout Page, the notification will disappear automatically.
This is also where we setup Payment Settings for LearnPress. You can set the following settings here:
- Auto Enroll: Auto enroll a user after they buy a course.
- Enable Guest Checkout: Enable user buy course as a Guest. ==> If you want your Unregistered Visitors to still be able to checkout while not creating any account, you should check this option.
- Enable Login In Checkout: Enable login form in checkout page.
- Enable Registration In Checkout: Enable registration form in checkout page.
Then, on the Left side of the Payment setting, you can see the General Tab and the Paypal Tab. Please click on it to configure Paypal payment setting.
From here, you can choose to enable Paypal payment or not. You can add your Paypal email so you can receive payment for your course directly via Paypal. If you want to test it, there is also a checkbox for Sandbox Mode. Sandbox Mode is a test feature created by Paypal so everyone can test to see if the payment system is working properly. You can check more about Sandbox Mode by Paypal here.
Remember to click the Save Settings button to save the changes.
Paypal is a built-in payment feature of LearnPress. Even if your students do not have a Paypal account, they can still pay with their credit card using Paypal. Don’t worry about this. Besides, if you want to have other payment options, you will need to install additional payment add-ons for LearnPress like WooCommerce Payment, Stripe Payment, etc. In this screenshot, I already installed WooCommerce Payment. We will learn how to enable WooCommerce payment for LearnPress in the next part.
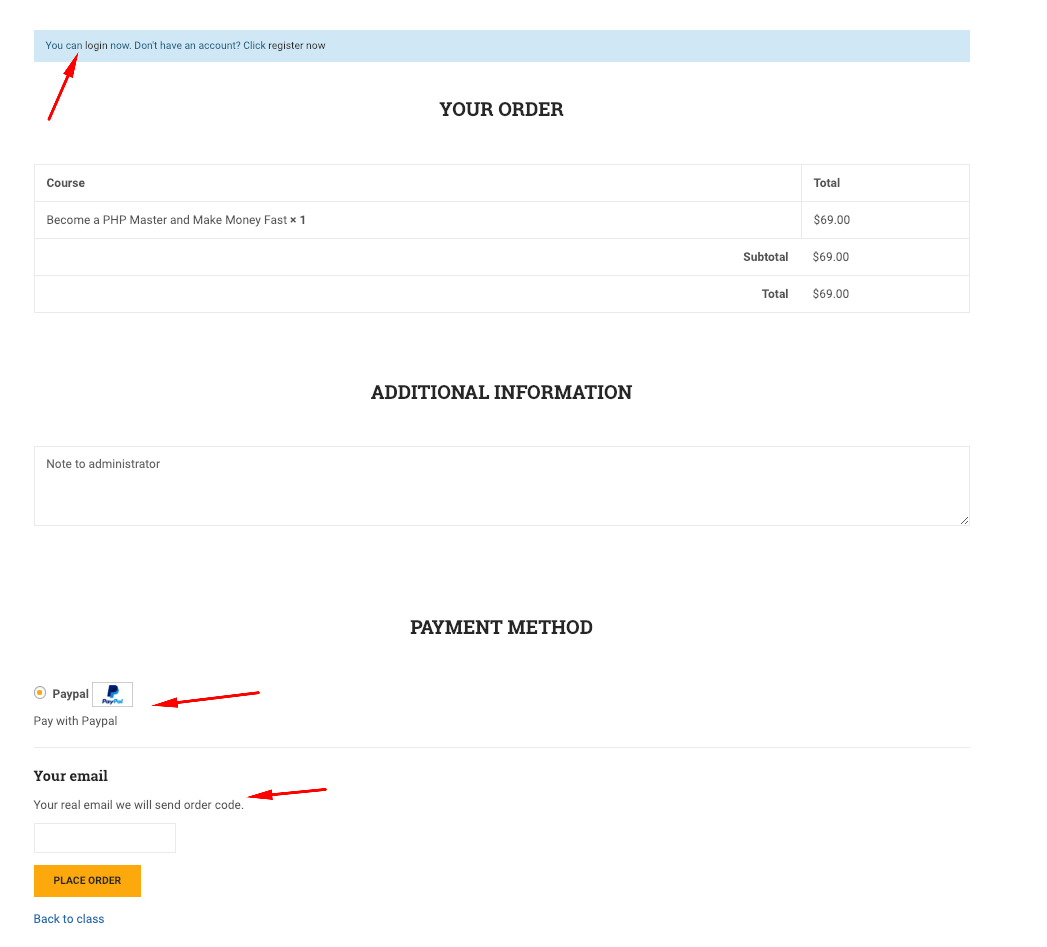
Now that you have setup Paypal payment correctly and given that you have checked “Enable Guest Checkout”, anyone clicking on a Buy This Course Button could be lead to the basic Paypal payment page like this:
2 – Set up WooCommerce LearnPress Payment the right way.
As I mentioned above, LearnPress use Paypal as the default payment gateway and you can add other payment gateways like via WooCommerce to extend the features of the LMS so your students can pay you in any currency, via any payment gateway, using any payment method like: Pay by check, Bank transfer, Offline payment, pay via a payment gateway like Payumoney, Stripe, Authorize, 2Checkout, etc. So, how to install LearnPress WooCommerce integration add-on.
If you are using a Premium Education WordPress Theme by ThimPress, it’s very likely that the theme comes with the LearnPress WooCommerce Add-on. You can get it by going to the Dashboard > Theme Name (Eduma, Course Builder,etc.) > Plugins and you will see WooCommerce LearnPress Payment Add-on to install and activate it.
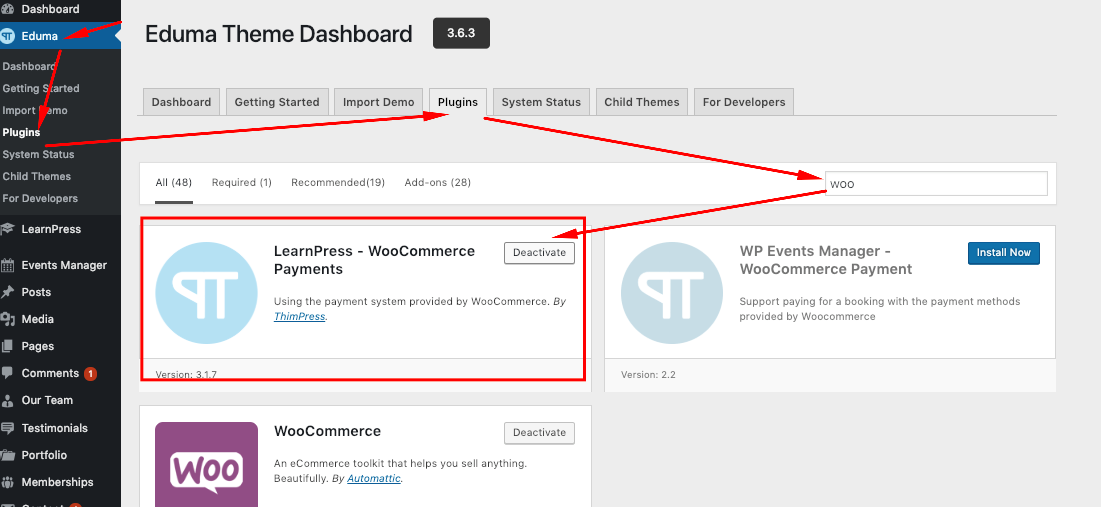
If you are not using a theme from us, you will need to get the Add-on here: WooCommerce add-on for LearnPress
After installing and activating the WooCommerce add-on for LearnPress, you will see another tab in the Payment Setting tab on LearnPress Settings.
If you are not seeing this, perhaps you will need to install the WooCommerce Plugin.
Please click on the WooCommerce Payment and you will see the settings for it.
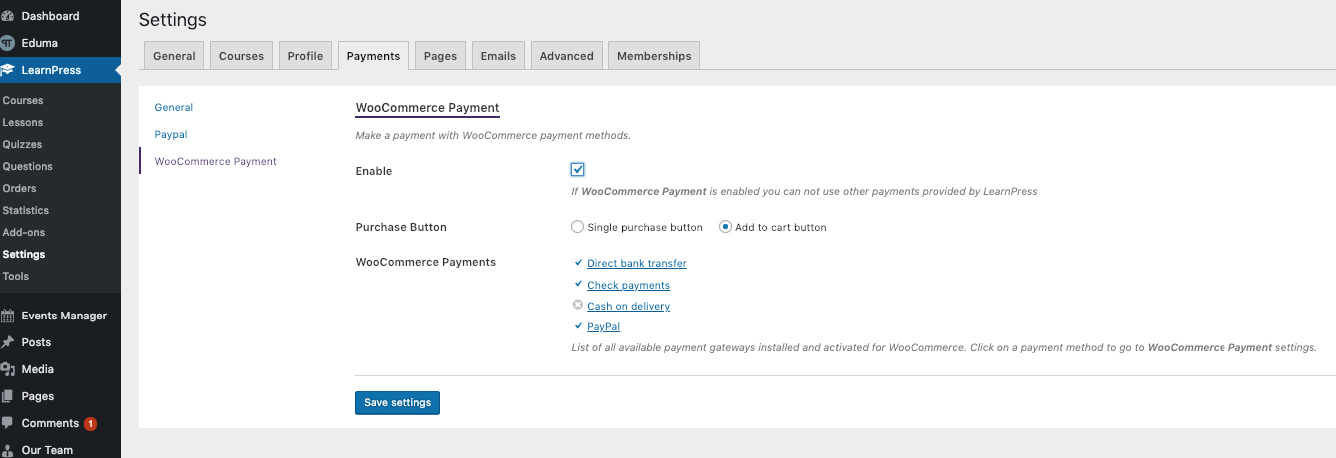
Here we can:
- Enable WooCommerce Payment
- Edit Purchase button: Choose between the Add to cart button or Single purchase button (Buy This Course)
- Configure which payment setting you want to use. By default, there are:
- Direct bank transfer
- Check payments
- Cash on delivery
- PayPal
It’s entirely up to you to choose which option. Let’s try to explore some options by enabling WooCommerce, use the Add to cart button and configure all the 4 payment settings above. Clicking on each payment option will lead you to the setting page for each of these payment option in WooCommerce. It’s where you enable them and add instruction for your users on how to finish the payment process like which bank account to send payment to, how payment are made, etc.
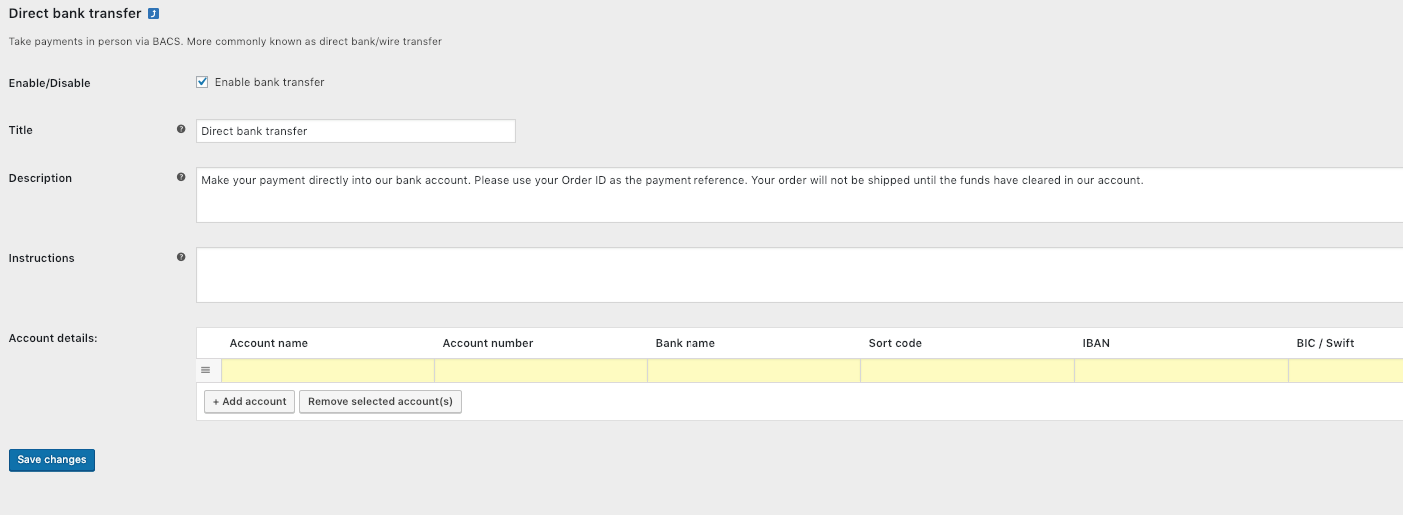
This is a sample screenshot of the Direct bank transfer payment setting. Other settings for other payment method are quite similar to this.
Enable Guest Checkout with WooCommerce
Even though we have enabled Guest Checkout for LearnPress in the first part, since we are using WooCommerce as our payment gateway, we will need to enable Guest Checkout for WooCommerce in this step if you want it to work. If you don’t want Guest Checkout, just skip this step.
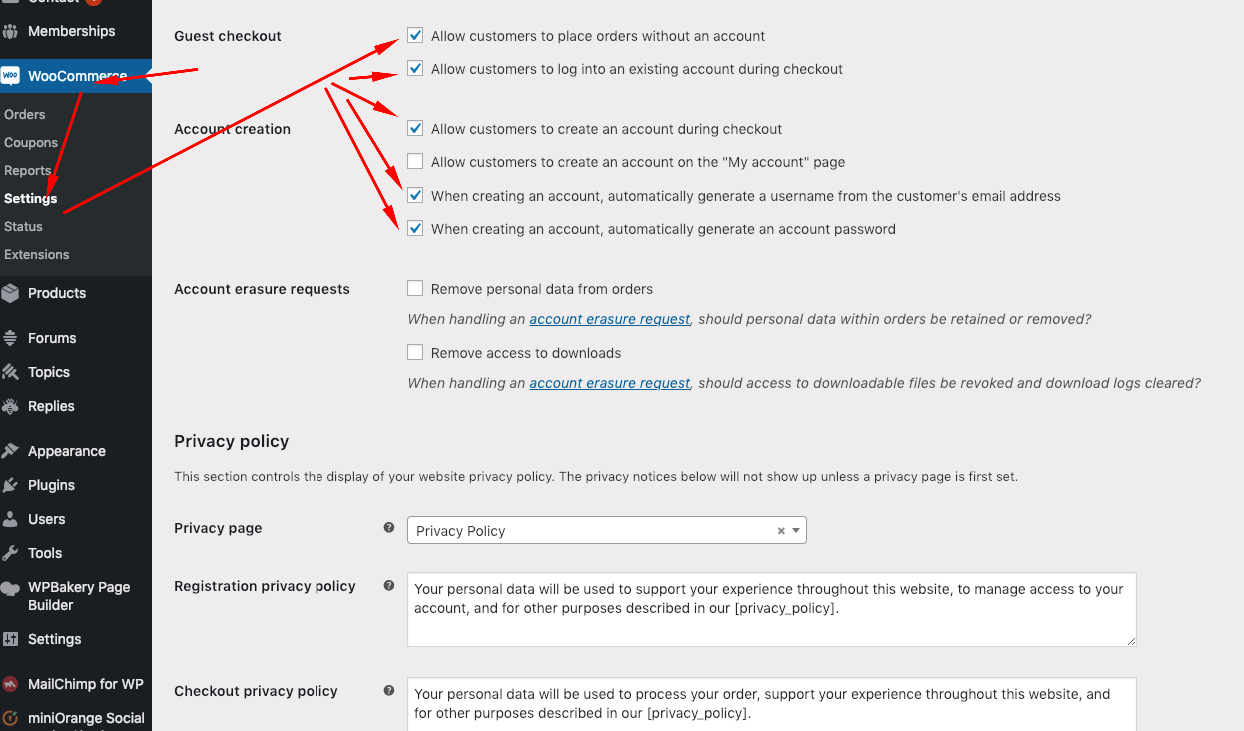
To do so, please go to WooCommerce > Settings > Tick on both the Guest Checkout setting:
- Allow customers to place orders without an account
- Allow customers to log into an existing account during checkout
You should also make sure these options are checked under the Account creation label:
- Allow customers to create an account during checkout
- When creating an account, automatically generate a username from the customers’ email address
- When creating an account, automatically generate an account password
3 – Extended: Installing any payment gateway with WooCommerce
So even when we install WooCommerce, we will only get 4 new payment gateway: Direct bank transfer, Check payments, Cash on delivery and PayPal. What if we want to install other payment gateways to pay using credit card, pay in other currency, etc? To do that, we will need to find a payment gateway that runs with WooCommerce and then LearnPress payment can be made using that payment gateway.
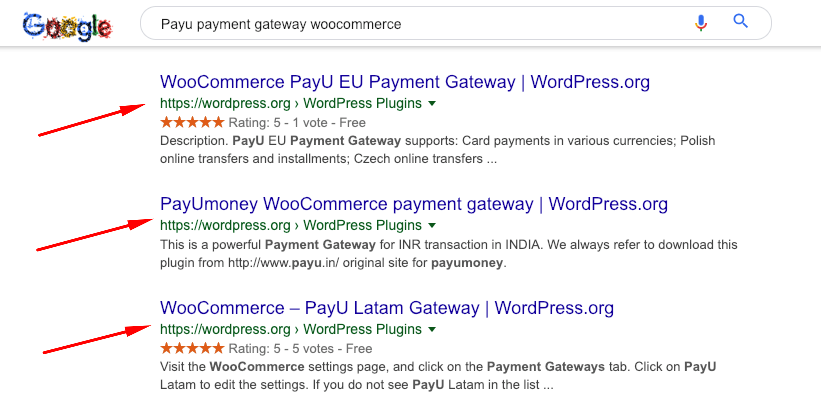
For example, if I want to pay using PayU, I can search on Google for “Payu payment gateway woocommerce” and I will find dozens of plugins for that payment gateway that runs with WooCommerce. WooCommerce is the official payment option for WordPress so almost all banks, payment gateway companies will want to integrate with it.
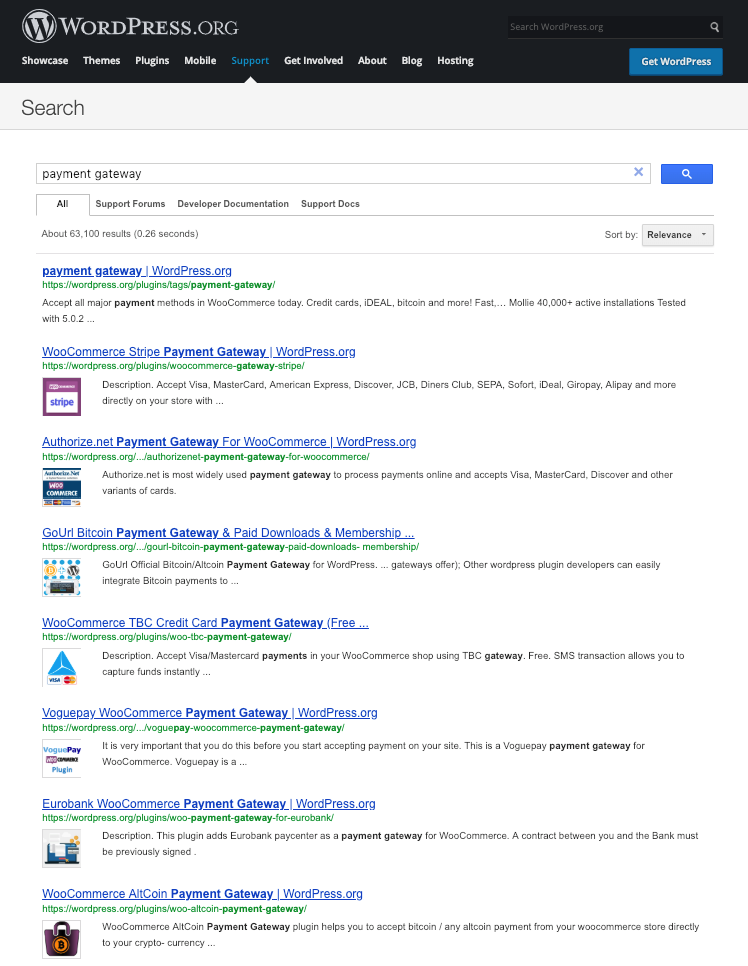
To look for a suitable payment gateway for you, you could also go to WordPress.org and search for a payment gateway plugin that integrate with WooCommerce and use it. Most of them will be free. For example, in this screenshot, I can find Stripe Payment gateway, Authorize.net, Voguepay or Eurobank payment gateway. Besides, I could even find cryptocurrency payment gateway like Bitcoin or AltCoin.
4 – Payment without WooCommerce
WooCommerce is an universal option for doing payment in WordPress. However, for some reasons, some people might not want to implement with it. Whether it is because of security, conflict with current system, speed, or just personal preferences, we understand it. For this reason, we have developed some other payment gateway integration add-ons for LearnPress that anyone can use without installing WooCommerce. They are:
- 2Checkout add-on for LearnPress
- Authorize.net add-on for LearnPress
- LearnPress – Offline Payment
- Stripe add-on for LearnPress
These add-ons are also available if you are using our premium LearnPress themes and can be found in the Theme > Plugins just like how you can get the WooCommerce Add-on. Otherwise, you will need to click on the link of each add-on to see its information and purchase it.
5 – Setting up Membership / Subscription
As LearnPress is a complete Learning management system, it also gives you the ability to add membership plan / monthly payment / subscription feature to your website by integrating with a membership plugin called Paid Membership Pro. Paid Membership Pro (the word “Paid” and “Pro” is included in the name of this plugin, don’t be confused with its version) is one of the most popular membership plugin for WordPress with more than a million site using it right now. It has a Free version and a Paid version. For your website to work and run as a subscription service, all we need is the Free version of the plugin. However, the free version’s name is still “Paid Membership Pro” because the plugin’s author intended to use the word “Paid” and “Pro” in the plugin’s title. Don’t be confused with the version.
To learn how to fully integrate LearnPress and Paid Membership Pro Add-on to create a subscription for your courses, please refer to this article: Adding Membership plans in LearnPress for your education WordPress website

Conclusion
In conclusion, it may be confusing the first time you install the theme and set the payment up. However, once you get to check this article, get into the nitty-gritty of the LMS, you will realize that it is not that hard. You are building a whole online school so it may take some time to learn how to use the system. LearnPress is a powerful and flexible system. Its ability to connect with many payment gateway and process payment in many types have proved this point. LearnPress LMS is an open project that constantly gets update, constantly gets improved over time so if you need help, please go to our Forum Support and create a support topic, our supporters are always willing to help you out.