
Introduction
LearnPress Learning Management System – LearnPress WordPress LMS is the most popular Learning Management System for WordPress with currently more than 50,000 websites, education facilities actively using it as their school’s system. It provides so many features for your website to turn it into an online course website, create courses, sell your course. You can sell your courses by course, or by monthly subscription. You can set other people as instructors or Co-instructor so they can also publish their courses on your website. There are many ways to assess your student’s work and then give them a certificate. We also added some reporting, gradebook feature for the LMS. Finally, we also have Pre-requisite course add-on and Content Drip add-on which only allow students to move on to one course when they finish a course, or move on to a lesson when they have finished some other lessons.
LearnPress LMS is designed in a modular system where you can always extend the LMS feature by adding more add-ons to enrich the system’s features and functionalities. This way, you could also keep the system light-weight and fast by not installing unneccessary add-ons/features. The complete list of free and premium add-ons for LearnPress LMS can be found here. We do have bundle options for the Add-ons so you can save some money on purchasing the LMS. We have the LearnPress Add-on Theme Bundle and the Learnpress PRO bundle. You can save a lot of money with the Theme Bundle: If you buy one of our LearnPress Premium WordPress themes, you will get the Theme Bundle Add-on for free. You can only use the Theme Bundle Add-ons for the website that is using our theme. For the LearnPress PRO bundle, you can use it for any WordPress Themes and you can use it on maximum 3 websites. It has 2 more premium add-ons compared to the Theme Bundle, which is the Assignment Add-on and the Announcement Add-on. The difference between Theme Bundle and PRO bundle can be found on the LearnPress LMS Pricing Page here.
LearnPress Theming System
One of the biggest advantage that LearnPress has over most other LMS that has made it the leading solution in the LMS industry, beside its powerful features and flexibility, is its amazingly beautiful templates. LearnPress is quite simple to work with, for both normal users and developers and it is so well-adapt that its UI quality is top-notch.
The list of the best themes that support LearnPress LMS are:
- Eduma: The most powerful, best-selling Education WordPress theme to both showcase your school and create an online school system. We highly recommend you usethis theme.
- IvySchool: The best School & Academy Theme for WordPress.
- Course Builder: If you are more interested in a modern UI, LMS focused experience, Course Builder is definitely the theme for you.
- ElearningWP: One of the first LearnPress LMS theme that is still very powerful and well-designed.
- CoachingWP: The best WordPress theme for Speaker, Coach, Coaching, Life Coaching, etc.
- Academy LMS: The only LMS WP Theme that we sell on our website
- Education Pack: The #1 Free WordPress LMS theme for education and university.
There are more WordPress LMS themes that works perfectly with LearnPress LMS but these are the themes that made by us so we are most-confident about those listed themes. Besides, we have tested the LMS with well over 20 top free& paid WordPress themes and we found that it is working quite well on these themes so you should not be worried about this.
LearnPress LMS Support Policy
LearnPress LMS is a free WordPress LMS plugin so support are done voluntarily by our supporters so, please be nice in all situations.
- If you are only using the LearnPress LMS (without using any other paid add-ons or paid themes from us – ThimPress), please use the free & voluntary support forum here: https://thimpress.com/forums/forum/plugins/learnpress-plugin/
Our respond time to support topic in this free & voluntary support forum is unguaranteed. However, our average support respond time here is around 2-3 business days maximum. - If you purchased our premium LearnPress LMS add-ons or LearnPress PRO bundle on ThimPress.com, please use the support forum here: https://thimpress.com/forums/forum/plugins/learnpress-premium-add-ons/
If you created a support topic in this premium support forum, as you are our paid customer, our support policy forces our supporters to get back to any support topic in within 24 hour business day. - If you purchased any of our premium WordPress themes, please go to our support forum: https://thimpress.com/forums and create a support topic on the corresponding support forum. Our supporters will try to get back and help you out in within 24 hours business day. You can check this note on how to create a support account and create a topic.
If you found a topic with the similar issue you are having but you cannot see the replies to it, don’t worry and please create a new support for your issue because the same issue code may not be because of the same reason. Our supporters will need to check your site thoroughly before reaching out a solution. Besides, due to privacy and security matters for our customers, the replies to most topics are hidden and only can be seen by the topic owner and our supporters. You can check our support policy here.
How to create a course
Overall, how to create a course, work with lessons and quizzes can be found on this video tutorial:
If you need a written step by step guide, please refer to the following:
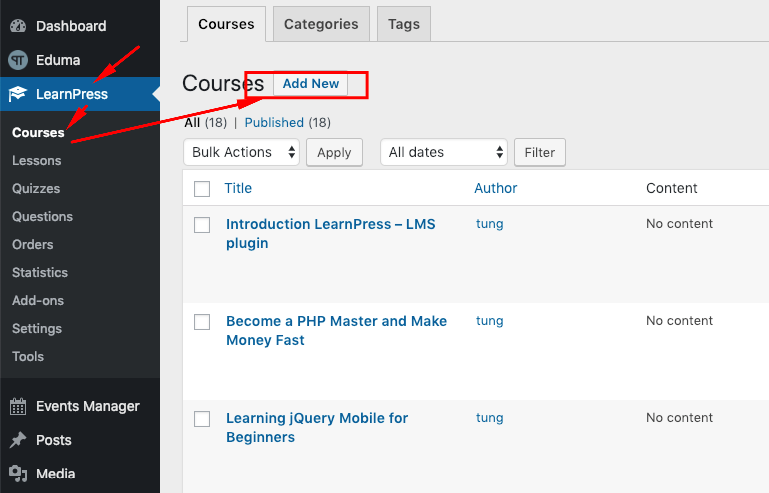
Once you installed LearnPress LMS, go to your WP Dashboard > LearnPress > Courses > Add New
Then you will be redirected to the Course Editor.
Here is how the Course Editor looks like:

Based on each section, in the above screenshot, I have separated each parts of the page so you can have an easier understanding. We have:
- Course Title: Title and Permalink (Link of the course) – You can setup permalink of the course after you’ve given it a title.
- Course Description: Where you add all the related information about a course. These information will be used to provide your visitors insight to the course so they can decide whether to purchase the course.
- Course Curriculum: The curriculum of the course. You will setup all the lessons, quizzes to the course in this part. To start adding lessons, quizzes to the course, you must first create a section name. A “Section” is like a big part of the course where all lessons and quizzes in that part is all about one specific information of that part.
- Course Settings: Set all the settings to the course. You can set pricing, course information like duration, number of allowed students, how course results will be assessed, etc. If you install extra add-ons to the LMS, you will see more settings here. There are tooltips for each setting so you will know what it is about.
On the right side of the course editor page, we have basic WordPress settings for the course like:
- Course Publishing information: Whether to publish the course or not, or to give it some restrictions.
- Course category: Category of the course.
- Course tags: Tags of the course to give visitors more insights.
- Course featured image: Featured image of the course.
How to create & edit a lesson
A. Creating a Lesson.
To Create a lesson, as I mentioned above, you will need to enter a section name. In this example, I used “Section One”. After that, you will see the option to add new lessons.
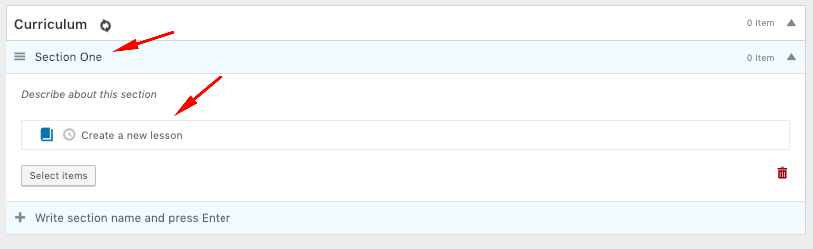
You could also give a description about the section.
If you already have multiple lessons or quizzes that are created but not assigned to a specific course, you can use the “Select items” button to find and add created lessons or quizzes.
Please understand that according to the system design of LearnPress LMS, one Lesson can only be assigned to one course. If you want one lesson to be used with more courses, please try to duplicate them.
B. Another way to create a lesson:
You could also add a new lesson by reaching to LearnPress > Lessons. This is where all lessons are managed. It will give you details about each and every lesson in your system. If you try to add lessons this way, you won’t be able to assign the lesson you created to a course right away. You will then need to go to LearnPress > Courses > Edit a course or create a new course to assign the lesson to that course.
C. Edit a lesson:
After you have created a lesson and assigned it to a course, if you hover to the lesson, you will see many options to do with it:
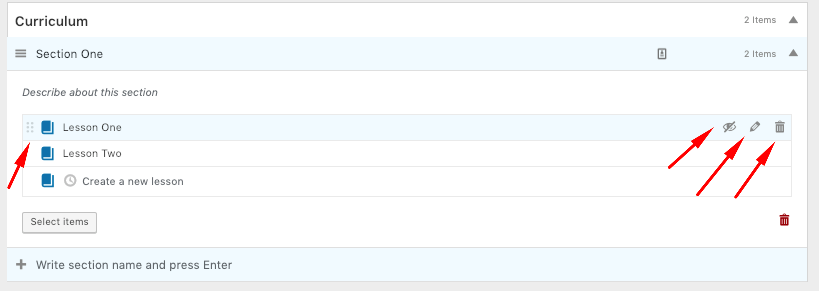
- Drag and drop the lesson to change its position
- Rename the lesson
- Make it previewable or not
- Edit it
- Remove it from the course (unassign) or delete it from the system completely
If you choose to edit the course, you will be led to the Lesson Editor Page where you can add more information, content to the lesson and give it some settings.
Here is how the Lesson Editor Page looks like:
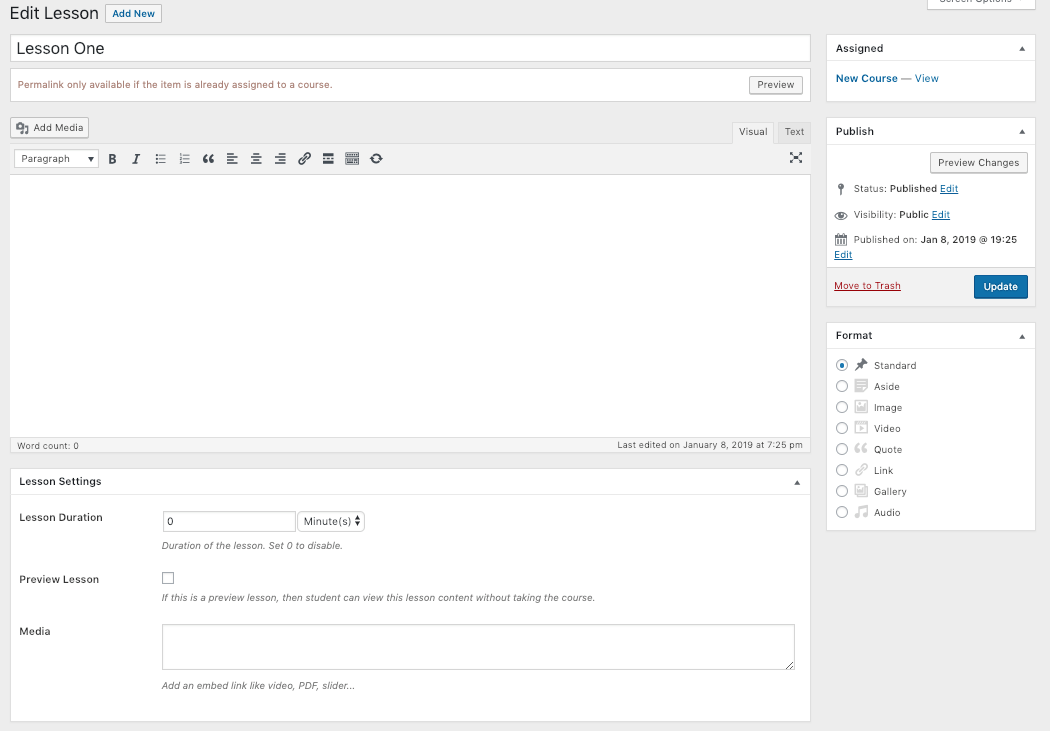
There are some more settings in the Lesson Editor Page:
- Lesson Duration: Duration of the lesson. Set 0 to disable.
- Preview Lesson: Toggle between previewable or not
- Media: Embed Iframe code if you want to make it appear as a video or if you want to add pdf, slider,etc to the lesson.
- How to create a quiz
How to create and edit quizzes and questions
A quiz is a collection of lessons. Creating a Quiz is quite similar to Lesson. You can create a new quiz by:
- Go to LearnPress > Quizzes where all quizzes in the system is managed
- Or go to one Course and create a quiz in the curriculum.
The Quiz icon is quite distinguishable with the lesson icon.
![]()
Upon editing a quiz, there are some new settings because you will need to create questions and setup lessons inside a quiz.
Here is how a Quiz Editor Page looks like:
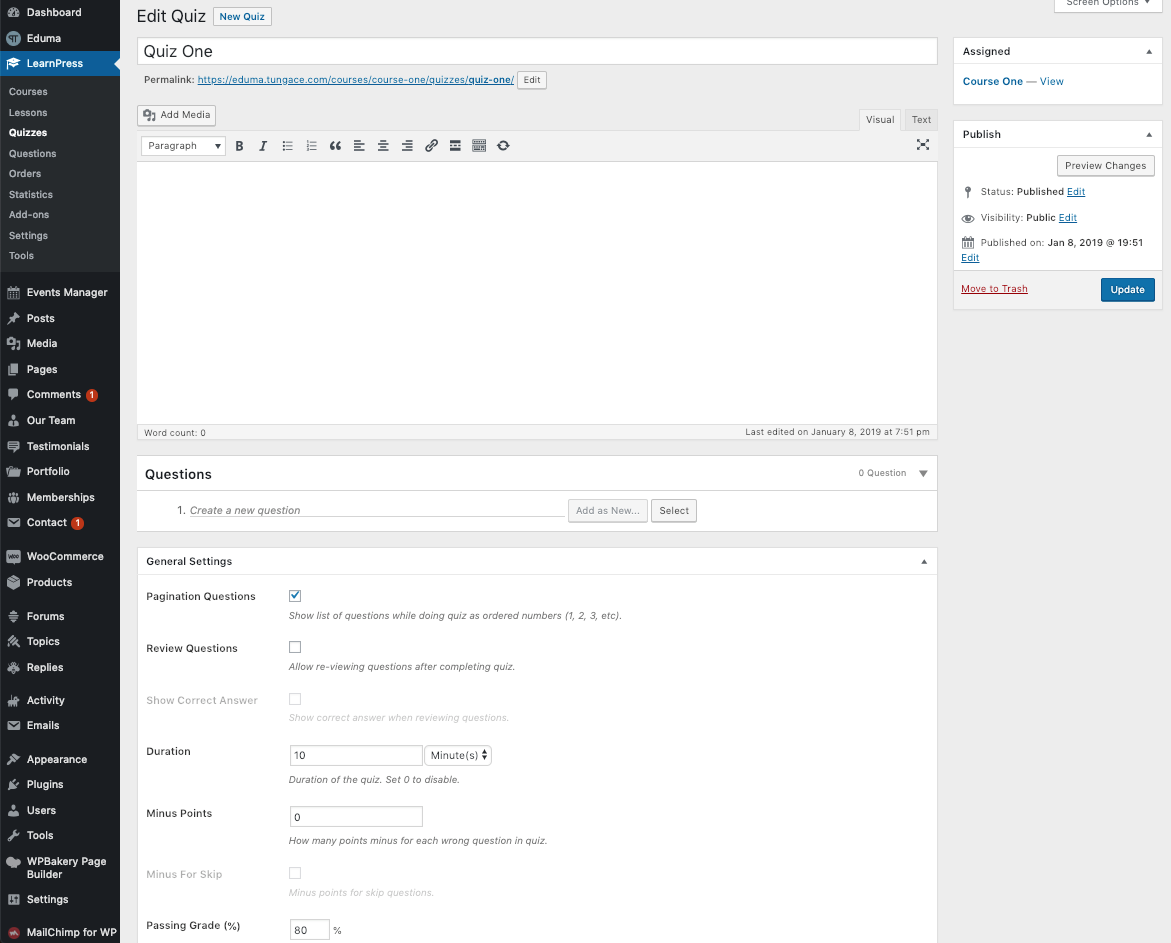
In the Course Editor Page, there are some settings:
- Quiz Title: Title of the quiz
- Quiz Description: Description of the quiz
- Questions: Where you can create new questions, or select questions created by using the button Select. You can start typing the question name and press Enter and it will open the Question Setting for you.
- Quiz setting: Setup some basic information for the quiz like Duration, minus point of an incorrect answer, passing grade (condition for passing), whether to allow showing the answer or hint while doing quiz, etc.
Adding Questions
As I mentioned previously, you can type the name of the first question in the question box and press Enter and it will open the Question Setting for you.
For example, in this screenshot, I created a question and here is what the question setting looks like.
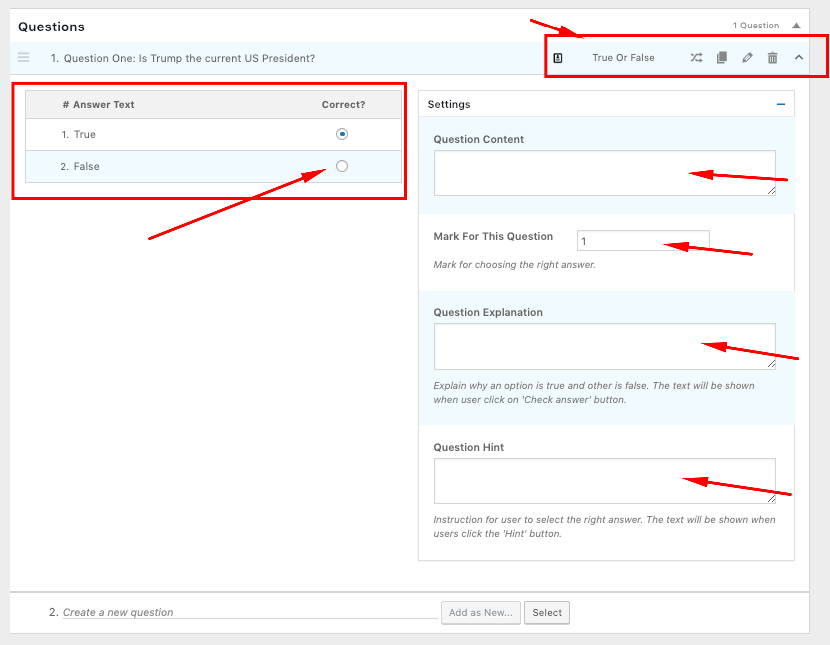
The default type for the question is True/False. You can switch to other question type if you want. The default available Quiz type for LearnPress quizzes are: True or False, Multiple Choice, Single Choice.
You could also duplicate the question, or remove it from the quiz (unassign the question) or remove it from the system permanently.
Down below, you can: Add more answer option, change text of the answer, choose the correct answer.
On the right side, there are more settings of the question that allows you to:
- Use the Question Content to add more content to the question to provide more detail to it. The editor here is quite simple. If you click on Edit Question icon on the top right of the question setting, you will be redirected to the Single Question Editor Page where you can use more Rich text formating or different editors.
- Mark for this question: Add mark for the question. If the student get it right, they will earn that mark.
- Question Explanation: Sometimes, you may want to give explanation to your question after your student have taken it.
- Question Hint: Sometimes, you may want to give your student some hints on what to do to find the solution.
How to add more quiz type (Fill in the blank, Assignments, etc)
By default, LearnPress comes with: True or False, Multiple Choice, Single Choice. Since we are the most popular WordPress Learning Management System, we have other quiz types available:
- Assignment: Allow instructors to create assignment where students can take their time to finish the task, submit a writing prompt, an essay, some files, etc. And then the instructor can check these work and give a score. You can check and get the Add-on here.
You can check this video to learn how to configure and use the Assignment Add-on: - Fill in the blank: Check the information of Fill in the blank type here
- Sorting Choice: Make answers sortable. This could do a great job on making sure the student understand the task. Please check for more information about it here.
- Random Quiz: This add-on only randomize the answers of a quiz, it won’t work as the “Question bank” feature. Please check for more information about it here.
How to update payment setting
By default, LearnPress use Paypal as its built-in payment processor. You can definitely install other payment system and integrate with LearnPress to make payment in any way you want using any currency you wish to. You could integrate with WooCommerce using LearnPress WooCommerce Add-on. You could also use other payment gateway system if you want.
Please check this article for the full tutorial on how to update payment setting in LearnPress, how payments are made, how to configure them the correct way: LearnPress Payment Settings: The All-in-one tutorial
How Instructor&C0-Instructor system works in LearnPress
As mentioned earlier, you can easily add other as instructors and co-instructors to your website using the Co-instructor add-on.
We all know that, for an education website that integrates e-learning features, Instructor is a must-have feature. Luckily, for LearnPress and Eduma, instructor and co-instructor have been implemented so strongly that it’s very easy to use with high effectiveness.
To learn about how Instructor feature works in Eduma, what Instructors can do, how to assign a course to an instructor, how to promote someone into instructor and all about instructors, please check this article: How instructor feature works in LearnPress and Eduma
How to create a certificate
LearnPress Certificate is a very good way to marketing your courses with the cost of zero.
Because if your students can get an awesome-looking certificate after they finish your course, it’s very likely that they will share to their friends on social networks, and believe me, these posts attracts a lot of people.
I shared my certificate on Udemy once and it got tonnes of likes and comments from people I don’t even know. They are curious what course I was taking, how useful it was, how much and HOW TO APPLY.
Please check this video tutorial for how to create Certificate in LearnPress:
How to configure Content-Drip Add-on
You can check more information about the Content-Drip Add-on and get it here: Content Drip Add-on
How to create a membership website & subscription plan
As an education organization, you may want to charge your students monthly instead of charging via courses.
In LearnPress, we have developed the Paid Membership Pro integration with LearnPress so that you can create membership plans for your students. This makes your pricing methods a lot more flexible. You can let your students pay per course, or pay by month (or a given period of time of your choice) or both, with a different recurring fees.
Here is how Membership looks like in real life site with Education WordPress Theme – Education WP.

To learn how to create a Membership / Subscription website using LearnPress and the Paid Membership Pro Add-on, please check this article: Adding Membership plans in LearnPress for your education WordPress website
How to create a gradebook
Gradebook allows you to check some insights, reports and analytics on your course. You can get the Gradebook Add-on here: LearnPress LMS Gradebook Add-on
How to communicate with your students using Email Announcement Add-on
You can get the LearnPress Announcement Add-on here